Two articles have been written but neither has been published yet…
The first is an overview of the whole issue of adding sound to model railways and is reproduced below or can be downloaded(450 kb).
The second is about the inspiration for, and development of, the RAS sound simulators and can be downloaded by clicking here.(300 kb)
Sound modelling – sixth dimension or third sense?
Part 1: An Overview
by Robert A Smith
Content
- Introduction
- Background
- The Sixth Dimension
- Realism
- Prototype Sound Files
- Prototypical Sound Creation
- Pre-recorded Sound Playback
- Synthesized Sound
- Simulating Sound Propagation Effects
- Simulating Sound Localisation Effects
- Operation
- Conclusion
- References
- Figures
Introduction
How many of the five human senses (sight, hearing, touch, smell, taste) does your model railway stimulate? How does this compare with reality, or even television, surround-sound cinema or computer games? We live in a highly stimulating multi-sense (multi-media) world but our model railways provide primarily visual stimulus. Could this explain our struggle to appeal to the younger generation? Maybe this is partly why we want to control layouts ourselves and operate controllers and signal lever frames – because this stimulates a second human sense of touch. I know that using my fully mechanical signalling system is an important part of the experience and a joy to operate. My visitors much prefer operating to just watching – especially the children.
But can we go further than this and stimulate other senses such as hearing and smell? They are potentially major enhancements to the modelling experience and my sound system has brought a smile to the face of many a visitor to my railway. As Michael Walshaw commented in his 1995 article on his sound system in Modelling Railways Illustrated [1], “…steam railways were noisy and steam locomotives were ‘living’ machines so why do so many people ignore the sound dimension?” As well as steam and diesel locomotive noises, he has included the sounds of the signal box and of seagulls in the repertoire of sounds on his Westport layout, which I have had the pleasure of visiting and operating. The most evocative experiences with my own layout have been when a locomotive starts, the exhaust beat accurately follows the speed of motion, and I hear an echo (produced by a ‘reverberation unit’) as if the nearest acoustically reflecting buildings are several hundred metres away.
In this three-part article I want to explore the possibilities open to us for including effective sounds in our portrayal of the prototype. The second part will introduce various commercially-available systems and kits, whilst the final part will cover DIY sound systems by documenting my own sound system, advising on the innovations that I have built into it and giving sources of electronic circuit designs for building your own.
In Part One, this overview aims to address the wider issues of modelling the sound dimension – issues that you will all have experienced but may not have noticed. Have you ever wondered why some claps of thunder last much longer than others? Don’t they all originate from almost instantaneous lightning strikes? I will attempt to use such everyday experiences to explain how to make sound systems in models more realistic. This is the same method as in many key modelling articles that have made an impression on my own modelling. I remember the first time I read about the different types of grass on an embankment and realised that I had overlooked this on my model. I had seen many real-life embankments but it was not until I had it pointed out that I realised my failure to really observe, and act on my observations.
Background
I can only remember one mention of ‘smelly’ models in the model railway press and that was in John Dornom’s articles in Model Railway Journal on creating smoke effects on his ‘Laira MPD’ layout [2-5] – an amazing move into another, ‘smokey’, dimension that I found fascinating, both in the photographs and in the flesh at Telford. He suggested that, as smoke-making machines are fed with fluids that also produce smells, it might be possible to produce a locomotive smell. The only other mention of anyone who has actually succeeded in making a smelly layout has been Michael Walshaw’s recollection of having smelt curry near a layout depicting the Darjeeling & Himalaya Railway at an exhibition. I look forward to reading more about ways of stimulating the sense of smell. However, several articles have appeared over the past 20 years on the use of sound [1,6-8] and, recently, some letters have been written in Model Railway Journal asking for more information. For many years systems for producing sound with attempted synchronisation to the train motion have been available in the USA and the UK, but there has been a recent resurgence in support from the trade, particularly with the increased use of digital command control (DCC), which offers great potential for a realistic, versatile, and synchronised sound dimension.
One of the points made by previous authors that I wish to re-iterate is that a considerable amount can be done to introduce sounds without any need to go for full synchronisation with train movement. A battery-based unit that will record a few seconds of sound and play it back thousands of times in response to an electrical trigger signal is available for just a few pounds. I use these for whistles and station sounds as well as coupling operations etc. A personal cassette player costing just £5 can be plugged into a small speaker to provide combinations of background noises such as birdcalls, passing trains, shunting operations etc.
My own experience of ‘noisy’ model railways is that they provide an extra touch of realism that I miss on other layouts. It seems strange that we claim to be able to see a visible difference with just 3% increase in ‘O’ gauge track gauge from 32 mm to 33 mm, and yet we have neglected whole dimensions of realism by failing to model sounds and smells. For many years this was due to the technical difficulties of producing realistic sounds, and the expense of the commercially-available systems – my Q-Kits system cost me £100 in 1994 – combined with the poor marketing of the available systems. But railway modellers have managed to overcome greater difficulties than these in the past, so I think there must be another reason for the reluctance to move into these dimensions. I guess it is partly because the visual sense is so dominant for us humans, but I think it also has something to do with the source of our inspiration. For me, and probably many others, much of the inspiration for our modelling comes from reading magazines such as Model Railway Journal but, unfortunately, there is no way of communicating the added realism of sound or smell through the pages of any paper-based magazine. Maybe these aspects will only start appealing to modellers when they gain inspiration from ‘multi-media’ sources such as the internet or video.
An obvious way of spreading the ideas of modelling sound would seem to be at exhibitions, but these are frequently in acoustically unsuitable venues such as sports halls with a high level of ambient noise requiring additional under-baseboard speakers to boost the volume. There have also been some comments in letters from exhibitors pointing out how annoying it can be to have to listen to the sounds from such ‘noisy’ layouts over several days of a show. However, if it had not been for Richard Gardner using his sound system [7,8] on an ‘O’ Gauge layout of a friend at an exhibition, I would never have caught the sound bug myself. Shortly after that I met Michael Walshaw operating an audible steam crane at Guildex when he was assisting on Nigel Macmillan’s ‘Campbeltown & Machrihanish Light Railway’ 7mm scale layout. These three gentlemen led the way for me and I am extremely grateful to them. Fortunately I am a ‘lone’ modeller building my own layout and there is no one to annoy except my family, the neighbours (who keep hearing that ghost train) and the numerous operators required for a running session!
A final positive point is that my sound system has a wonderful ‘gimmick factor’ – providing a talking point for the many operators and other visitors to my layout. My teenage son, who mastered block signalling at an early age, is now far more interested in the gimmicks on my railway than in operating trains, or seeing a realistic visual scene from the 1930s.
The Sixth Dimension
So what of the ‘sixth dimension’ mentioned in the title? I have left this until the end of the introduction as it is merely an interesting aside, but one that may be of interest to some readers. Whilst most of us model in five dimensions (three spatial dimensions plus time and colour), I sense that more people are becoming interested in extending their modelling to the sixth and seventh dimensions. From a modelling point of view, the number of dimensions can be defined as the number of different aspects of the prototype reproduced in a model. A model of a stationary object built in white card is three-dimensional but if it is made to move it becomes four-dimensional – time being the normally accepted 4th dimension. As soon as it is painted with colours it becomes five-dimensional. In this way we use both colour and movement to improve the illusion of reality in our models and are then modelling five dimensions of the prototype. But all five of these dimensions stimulate only one of the five human senses – sight. What then are the sixth and seventh dimensions that I mentioned above? I was of course referring to sound and smell. Not only are these extra dimensions, but they also stimulate the third and fourth human senses in the observer and hence are potentially major enhancements to the modelling experience.
Realism
For the first 5 dimensions (three spatial dimensions plus time and colour), the issue of scale has proved crucial to the pursuit of realism and, for this reason, has been hotly debated in the model press. The coarse scale – fine scale – scalefour/seven progression has improved the dimensional realism of our models and, arguably, the realism of their motion. The scaling of time and the realistic motion of trains has been hotly debated and is not straightforward due to the shortened distances between stations on our layouts. A debate has also taken place regarding realistic colours – for example, whether they should be toned down if viewed from a long scale distance, or whether particular shades were colourfast for long on the prototype.
For these new dimensions – sound and smell – scale is an issue concerning source localisation and propagation distances. Sounds and smells can be very localised on the prototype, with big variations in strength and quality depending on the distance between the source and the observer. This is difficult to achieve in a model, especially if the observer remains stationary or cannot get close to the source of the sound or smell. For smells, John Dornom came close to addressing the localisation aspect with his atmospheric smoke system [4] where he could produce smoke from small holes concealed at appropriate points in the baseboard.
For sound, there is a fundamental acoustical effect of scale because the wavelengths of the sounds remain unchanged on a model, whilst the size of the whole ‘scene’ has reduced by a factor of between 43 and 152, for 7 mm and 2 mm scales respectively. The result is that the higher-pitched (short wavelength) sounds can be more effectively localised on the layout than the low-pitch (long wavelength) sounds. This is the reason why Michael Walshaw [1] uses small on-board speakers (which can only output the short wavelengths) to give a sense of location, and larger below-baseboard speakers to fill in the low-pitch sounds and increase the volume for exhibition running. However, the observer’s ability to discern the direction of a sound remains unchanged by the scale of the model and this can be exploited on longer layouts using a stereo or multi-speaker system to produce sounds from specific directions. This method was discussed by Richard Gardner [8] and is my favoured method for moving the ‘effective’ sound source to follow a locomotive. I also have certain sounds such as whistles and station sounds that are produced by small speakers at prototypical locations and are triggered by a locomotive passing over a reed switch embedded in the track.
Other acoustical factors affect the way sounds are modified when they travel over a distance in air. We are used to hearing these changes, but take them for granted and rarely think about them or their cause. They become important now because they do not follow the scaling factor of our models. There are three physical effects that modify sounds when they travel across large distances on the prototype and their technical names are: attenuation (reduction in volume), reflection (echo), and dispersion. Sound is attenuated as it propagates – not only due to the spreading of the sound field, but also by absorption, and higher pitched sounds are absorbed more than lower ones. This is why the roll of thunder from a distant lightning strike has a lower pitch than from nearby lightning – the lower pitched sounds travel further. The second effect is the reflection of sound from objects that it encounters. A single reflector will produce a single echo, like the reflection from water in the bottom of a well. Multiple reflectors, however, will produce multiple overlapping echoes that make the sound appear to decay away gradually – such as the long reverberation time in a cathedral. Finally, dispersion is a phenomenon caused by slightly differing propagation speeds for different pitches of sound. The effect is to cause a pulse of sound to spread out in time. To use the lightning and thunder example again: a short clap of thunder heard by a nearby observer becomes a long drawn-out roll of thunder after propagation a few miles away. The roll of thunder will also gain some structure (louds and softs) due to reflections and variable attenuation in the air on the way. Hence a roll of thunder is a good example of all three of these phenomena. (Listen to thunder: Nearby, Far away, With structure. If you cannot play these files then I suggest you use the link in the next section to download the RealOne Player free!).
It is interesting to consider some railway-related sounds in the context of these phenomena. A short ‘pip’ on a steam whistle will sound to the driver as if it has a sudden start and stop. A quarter of a mile away that short pip will be heard as a more drawn-out whistle with a ramp-up and a ramp-down in the sound. The noise of an engine working hard on an incline half a mile away will actually have such a long reverberation time, caused by multiple secondary echoes, that each ‘chuff’ will merge into the next. In fact, just about any real-life locomotive sound is heard together with multiple echoes that make it sound ‘real’.
So what do these phenomena have to do with sound modelling? Simply that none of these distance-related effects will be reproduced by the short distance from the layout to the observer and so they must be either ignored, simulated, or the sounds must be played back from real recordings that include these effects. It is amazing how unrealistic simulated sound is when you turn the reverberation unit off. The improvement when I added a reverberation unit to my own simulated sound system was considerable and definitely worth the effort.
Apart from the above localisation aspects, the realism of sound reproduction on a layout is primarily a matter of accurate reproduction of the true railway sounds. As with music making there are three options for sound generation: creating the sound from a similar source to the original, playing back pre-recorded sounds, or synthesizing the acoustic waveforms. Michael Walshaw and I both use examples of all three of these on our layouts and they form a useful sub-division for the remainder this overview. Methods of reproducing the distance-related effects of sound propagation and sound localisation are then presented separately.
Prototype sound files
Some steam railway sounds (.wav files): Steam train entering station, Steam train departing, Train rolling past, Steam train rolling past & hissing, Steam train in motion, American steam 1, American steam 2, American steam 3
Diesel locomotive sounds (.mp3 files) from a very good British diesel sounds web-site – these are just three examples: Class 47 at speed, Class 47 horn and slowly moving off, Classes 03 and 08 diesel shunters. The zip files that you download from these links contain copyright statements and can be downloaded to listen to. If these sounds are downloaded for use in a model project and may involve editing the sounds, the copyright holder(s) should be contacted for permission as this may fall outside the permissions given.
If you cannot play these files then I suggest you download the RealOne player free, using the following link.
Download the Free RealOne Player
Prototypical sound creation
Block bells and whistles blown by the operators (authentic Guard’s whistles and ‘steam’ whistles are available at many preserved railway shops) are examples of creating the sounds prototypically, but they lack the ‘gimmick’ factor and it can be hard to get youngsters to take them seriously. I sometimes use Guard’s whistles for emergency communication between my garden and the railway room but prefer other methods of producing steam whistle sounds.
Block bells included as part of the signalling system can also add authenticity through the sound dimension. It is in the model ‘signal box’ that the senses of sight, touch and hearing all come together. That is why I try to get all visitors to my railway to take on a signalman’s job – because it is only then that they get to experience all aspects of the railway. My regular operators work through a series of qualifications from Trainee Signalman to Relief Signalman and have to pass a test at each stage. Some people use genuine block instruments and bells as part of their signalling systems. I am sure these sound far better than mine, which are created using old telephone bells with electromagnet-operated striking mechanisms and a capacitor discharge unit to ensure a clean strike. The main reason that my bells sound unrealistic is because of their small size, which gives them a much higher resonant frequency; ie the note they produce is much higher pitched.
I have heard many comments about the realism of the wheel noise from ‘O’ Gauge rolling stock, and especially from the heavier coarse-scale stock. My father-in-law’s coarse-scale layout uses Bassett-Lowke ‘scale model track’ and quite heavy coaches are run on it. The realism of the clickety-click is not lost on me when I witness a running session. Another important thing for realistic sounds is to ensure that rail joins are the correct scale distance apart and do actually cause the wheels to make a noise as they pass over them. The gap, or notch, needs to be considerably larger than the true-scale size of gap in order to produce a realistic and audible sound.
I recently read an article that suggested a realistic sound could be produced by not oiling the bearings on goods wagons, specifically so that they eventually squeak and squeal in a ‘prototypical’ manner. To my hearing this has not been realistic when I have failed to oil my wagons and I rectify the situation immediately. The noise is actually quite loud and extremely annoying, as well as being at a much higher pitch than on real wagons. This is due to the scale factor, which makes the resonant frequencies of the wheels considerably higher – by several octaves! This is a real give-away that it is a model wagon you are hearing.
Pre-recorded sound playback
I have old cassette and CD players installed above and below the layout playing noises of: shunting, coupling, doors slamming, Guards shouting and even a copy of Michael Walshaw’s tape of seagulls!
Digital sound from the new DCC systems is also generally a play-back of pre-recorded sounds but in some cases this is so sophisticated that it appears to be a combination of synthesized and play-back. For example, the ZTC sound capabilities on their DCC sound modules, despite being based on high-quality digital sound recordings, are fully synchronised to locomotive movements. Their background sound effects are extremely realistic and I understand that they will be making these available on a CD. I hope to provide a review of this CD later in these articles.
I use an EPROM playback module that I bought from Maplins to give a very realistic steam whistle and diesel horn. These are digital recordings that were stored on the EPROM chip prior to sale. I also use various record/play-back units, some destined for ‘noisy’ greetings cards that allow both a record and a playback facility, others more sophisticated versions (to be reviewed in Part 2). These are placed at strategic locations around the railway and I trigger them using reed switches embedded in the track, operated by locos fitted with magnets. I actually use two ceramic magnets to provide maximum magnetic field strength without needing to have the magnet too close to the reed switch (see Figure 1).
Figure 1. Most efficient ways of orientating ceramic and bar magnets for transverse reed switch operation.
Stephen Denny has tried using reed switches on his N gauge layout but found problems with positioning magnets under the locomotives or rolling stock. He also found that the weight of these vehicles was unsufficient to prevent them being moved towards the reed switch by the magnetic attraction.
An alternative to reed switches and magnets is infra-red train detection, which requires no attachments to the rolling stock. An example of this type of train detection is the IRDOT units obtainable from some suppliers (details will be given in Part 2).
Synthesized sound
For the generation of the steam or diesel locomotive noises, I wanted synchronisation of the chuffing with the speed of the locomotive, and preferably the volume and tone related to how hard the locomotive should be working. Hence I opted for synthesizing the sounds and, like Michael Walshaw and Richard Gardner, started with a ‘Q-Kits’ Sound System, produced by Mike Cole in the 1980s and 1990s. I believe this was a different company to the one of the same name that is currently trading. Since then I have modified mine beyond recognition and I suspect that the only original components are the box and the knobs and switches! Whilst the Q-kits system represented some of the desirable features quite well, my desire to understand how it worked and then improve on it involved me in a lengthy period of investigation, some of which I will share in later parts of this series of articles.
The Q-kits system produced realistic diesel noises as well as steam sounds, but I was only interested in the steam sounds and have to admit to removing the diesel parts of the circuit to make room for my other modifications. The concept is different for diesel sounds and, I believe, somewhat simpler to implement than for steam. The basic idea for steam is that a source of ‘white noise’ is applied to a circuit that will modify its amplitude (volume) to form ‘chuffs’ at a rate determined by a voltage related to the loco speed, which can come from the track, or maybe directly from the controller (for example from the feedback loop of a pulsed feedback controller). This immediately raises two issues: firstly how to relate that controlling voltage to the actual speed of the loco, rather than just the track voltage applied to it, in order to obtain 4 chuffs per driving-wheel revolution (for two-cylinder locos), and secondly how to control the volume of the ‘chuffing’ so that the loco does not sound as though it is still working hard when coasting or slowing down.
Dealing with the first issue, that of matching the loco speed, there are four solutions that I know of.
- The ideal solution would use a pulsed ‘feedback’ controller. Some of these controllers (caution – not all!) utilise the back-emf generated by the motor in the ‘dead’ sections of the pulse-train to monitor the loco speed and feed it back to the controller. Tapping off this feedback voltage and using it as the controlling voltage for the ‘chuffer’ circuit would accurately match the loco speed to the sound system. Unfortunately I do not have such a controller so I have been unable to attempt this method.
- The second solution, and possibly the only one that matches the speed exactly, is the use of a 4-lobe cam on the loco driving axle, used in the PFM system that used to be manufactured in the USA. Richard Chown of Castle Rackrent fame uses this but, as Michael Walshaw stated in [1], this equipment is no longer manufactured. An interesting development would be to use such a system to produce an electronic signal to control the chuffing rate – maybe a high frequency carrier signal modulated in amplitude or frequency (as in AM or FM radio respectively) so that it does not interfere with the control of the loco.
- The third solution is the mechanical clutch mechanism developed by Michael Walshaw [1] that allows him to manually start increasing the voltage to the sound system as soon as he sees the loco move.
- I have grappled with producing a fourth, electronic method and eventually resorted to using different pre-set resistors for the ‘start’, ‘cut-off’ and ‘rate’ chuff characteristics of each loco, selected using a single rotary switch (see Figure 2). The ‘start’ setting has a tendency to vary with the load of the train but as my layout is restricted to relatively short trains I have not found this to be a problem. This will be described in more detail in a later part of this series of articles. The ‘rate’ control adjusts the chuff rate in relation to the controlling voltage, while the ‘cut-off’ control changes the length of the chuff – these both change from loco to loco and are pre-set for each of my locos.
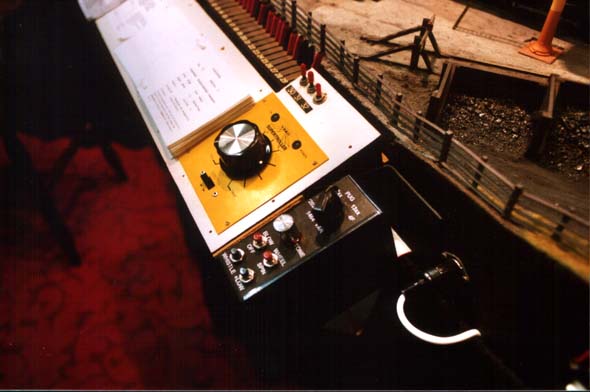
Figure 2. Diagram of my signalman’s control unit with the rotary switch (top) used to select the ‘chuff’ characteristics of the particular locomotive being controlled. The ‘VAR’ setting switches in the rheostat controls on the Q-Kits system. Other controls are mentioned in the text. Pressing both the black buttons produces a lower pitched whistle than the left button on its own.
The second issue – that of modifying the volume of the ‘chuffs’ to reflect the effort of the loco – is another difficult one. If nothing is done about this then the loco sounds as if it is still working hard even when it slows down to a stop. It is possible to make these adjustments manually using the volume control but this requires a dedicated sound-system operator and I have found this is not a popular job amongst my operators! As an automated alternative, I have developed an electronic solution. This determines the rate of acceleration of the locomotive based on the rate of increase of the track voltage. The volume of the chuffs is modified to reflect the rate of acceleration, on the basis that this should be directly related to the work the locomotive is doing. If the track voltage remains constant because the loco is coasting, the volume gradually decays and so I call this the Auto-Coast feature. This is the most significant improvement I have made to my Q-Kits sound system and means it can be used quite realistically without needing anyone to supervise it.
Another variant of this has been tried by Stephen Denny, with whom I have corresponded since we met at his father’s house – I was demonstrating my sound system linked up to ‘Buckingham’! Stephen found that by monitoring the electrical noise on the track current, generated by the electric motor, he can determine whether the motor is in motion or not. If not, then he clamps the sound output volume to zero. This at least stops the sound of chuffing when the locomotive is stationary.
The Q-kits system also had ‘blow-off’ and ‘whistle’ buttons. Originally the blow-off feature gave full ‘hiss’ sound when pressed and I have just had to modify the volume of this so it does not sound as though the loco is right next to me! The whistle was a single tone and I spent a long time determining the correct pitch of GWR whistles from recordings (885 Hz and 925 Hz, with all other harmonics more than 20 dB quieter) and modifying the circuit to give these two pitches depending on the buttons pressed. (It turned out that Mike Cole had got it quite close!) I then checked that these were in tune with my recording of ‘Clun Castle’.
I have added an extra feature that I call ‘wheel-slip’ where the operator presses a button that applies a sudden extra voltage to the loco-speed input. This extra voltage gradually decays through a capacitor and fortunately the volume seems to decrease as well, as if the driver has backed off the regulator. This of course is not synchronised to the wheels of the loco! Michael Walshaw can achieve the same effect with his mechanically-clutched system, by manipulating the chuff-rate pot with a spare finger or thumb [1].
Simulating sound propagation effects
For a sound to be realistic it needs to simulate the effects of travelling the scale distance to the observer and having encountered reflecting obstructions like those in the model. I will deal with these two aspects separately.
The approximate distance to the observer will vary, depending on the scale of the layout and its size, from 30 to 300 metres or more. Hence for the larger scales there will only be a small reduction in the high frequencies and some softening of the sounds, whereas for N Gauge most of the higher frequencies will disappear and sounds will be quite indistinct. In order to simulate these distance effects, a simple low-pass filter circuit can electronically remove the higher frequencies – this is labelled ‘tone’ on my Q-Kits system. A sound that changes considerably with distance is a steam whistle. Whilst the dominant pitch is still the same, the tone will vary due to the loss of the higher harmonics, and the start-up and shut-off times will increase with distance. I simulated these changes with a low-pass filter, and with capacitors in the switch circuit to increase the volume gradually. This has the added effect of removing any spikes (crackles) on the whistle when the switch is pressed. It was at this stage that I needed echoes or reverberation for my whistle to sound right. It sounded as though it was in a well-carpeted living room with the curtains drawn!

Diagram showing how the frequency spectrum is attenuated more at high frequencies by propagation in air.
Graphs showing example waveforms before and after dispersion which causes broadening of the pulse.
An example of the signal from several superimposed echoes.
Although in the open air there are not the obvious sound reflectors like the walls of a room, there are actually a surprising number of sound reflectors that cause echoes. Apart from the rumbling of thunder, think of other examples of sudden open-air sounds that are followed by echoes – fireworks, explosions, gunfire (I live near army training grounds!), a public address system at a showground, etc. Have you ever noticed what happens when a TV presenter’s microphone fails and the production crew switch to another microphone further away from the presenter? Suddenly the sound gains some echoes and you get an impression of the size of the room the presenter is in. That is because the direct sound path to the microphone is no longer the dominant one. There are several sound paths, both direct and via reflections, and you are hearing the echoes of the reflected sound. I cannot think of a better example to illustrate the need for these echoes in order to make a sound system realistic.
There do not seem to be many options available for simulating these echoes. The music industry uses items called ‘echo’ units and ‘reverberation’ units, but I am not sure of their terminology. It would seem to make sense if an ‘echo’ unit provided a single echo after a certain delay, whilst a ‘reverberation’ unit produced a series of gradually-decaying echoes. If this is the case then I suspect the reverberation unit is really what you want for this application. Such units are available as electronic packages from music shops, but they seem to still be rather expensive. Sometimes one unit can be purchased with several knobs offering different acoustical effects like ‘echo’, ‘reverb’ and ‘wow’!
A few years ago, before everything went digital, I was advised by Mike Cole of Q-Kits – supplier of my original sound system – that it was possible to buy a ‘spring line’ to act as a reverberation unit. I would be very interested to learn of a UK-based supplier of these now, as I believe they have been superceded by electronic versions and are only available from antique electronic suppliers. My spring line cost me about £20 in 1994. It is literally a spring suspended so that it is free to vibrate. An acoustic vibration is introduced at one end and travels to the other end where some of it is detected and the rest is reflected back. This process repeats at each end until all of the sound energy has transferred out of the spring. By feeding some of the signal from my sound system into the spring line input, and mixing the output with the original sound, a very convincing effect is produced that sounds to me like I have suddenly put the sound source into a realistic open space. The details of any sources of these components will be given in Part 2.
Simulating sound localisation effects
This boils down to trying to make the sounds appear to come from the correct location – the locomotive or other sound source in question. I have already mentioned the use of large loudspeakers (‘woofers’) under the baseboard in combination with small speakers mounted in the locomotive (Michael Walshaw can squeeze his Farnell speakers into a ’00’ Gauge B4 0-4-0T). But for my layout, I did not relish the idea of transmitting audio frequencies through the rails to my locomotives, especially now that I have changed over to pulsed controllers using pulses in the same frequency range (50 or 100 Hz). I also had concerns about the audible response (loud crackles etc) to the electrical spikes resulting from poor electrical contact to the track due to dirty wheels or dusty track. I use rigid chassis loco construction and some of my early track was built on chipboard in a damp garage – causing some poor contact in places. Having said this, I did not notice any problems of this nature on Westport [1]. Michael Walshaw says that he has no problems at exhibitions where the level of ambient noise is greater, but sometimes, in the quiet of his home, the crackling can be heard. He has also mentioned to me that, even when the sound system is switched off, these electrical spikes produce crackles at the on-board speakers
On reflection, considering the difficulties of other sound localisation methods, I think that I would consider on-board sound, especially if I used smooth DC controllers. If the low frequencies are to be produced by ‘woofers’ under the baseboard then it might be possible to filter out (in the locomotive) everything below about 200 Hz and stop any pulsed-controller interference getting to the small loco-mounted speaker. This would solve the problem of interference from pulsed controllers, but not the spikes, which contain high frequencies too. Obviously the new commercially-available sound-enabled locomotives use on-board sound. Some of these do not transmit audio frequencies through the track and thus will be immune to these problems.
An alternative to feeding the high frequencies through the track is to have two or more speakers under the baseboard and direct the sound to the one nearest the locomotive. Track circuits could be used to throw the sound in this way, but I have yet to build them into my system. I believe Q-kits offered these as ‘track circuit modules’, as well as a simpler ‘speaker-activating module’ that just had a series of manually operated switches to fade in the correct speaker.
Figure 3. Electrical connections for the linear rheostat that localises the sound based on the position of the wiper. The density of turns increases beyond the last tapping to cause a reduction in volume as the loco disappears into a tunnel or under a bridge.
Although I did not invest in the track circuit modules (but wish I had) I thought I could improve the manually operated switch version by winding my own large linear rheostat (wound on a strip of wood with resistance wire) where the input sound signal is fed in via the wiper, and various tappings feed the different speakers on my layout. By increasing the density of turns at the ends the volume diminishes as the loco enters the tunnel or goes under a bridge. I have recently changed to using copper-clad strip-board (Veroboard) with discrete resistors between strips to provide a cleaner and more versatile transition as the slider is moved across the strips. Michael Walshaw [6] describes an early version of this type of rheostat method, when he had a dedicated Sound Effects Operator to operate a control like this to move the sound source across the layout in synchronisation with the moving loco. Unfortunately his exhibition team hated it, so he devised his on-board speaker system, described in [1], to localise the sound.
The train operator can ‘throw’ the sound by sliding the wiper along the rheostat to follow the train’s movement. The advantage of this method is that all of the speakers are operating but at different relative volumes, and the sound moves gradually along with the train. If you shut your eyes and listen to an express train passing on my sound system the effect is very realistic. The practical problems have not all been solved with this rheostat method and I am struggling to provide a clean movement of the wiper – for some reason Electrolube made this worse – perhaps MRJ’s lubricants guru can explain this for me.
Stephen Denny has been experimenting with computer-control of his N gauge layout and has found a way of fading the sound from a speaker, for example when the locomotive passes into a tunnel. The only addition is a voltage-controlled volume control between the output of his Maplins ‘Chuffer’ circuit and the power amplifier. Using this volume control he can fade the sound level under the control of the computer. The volume control is connected to the computer via a digital-to-analogue converter (DAC) and an input/output (I/O) ‘address’ decoder. Writing the Basic “OUT” command to the appropriate address sets the volume level. The theory is that as the train is disappearing off scene it is detected by the computer using a reed switch or other sensor. Then, under control of the computer program, the volume is slowly reduced. A similar method could be used for passing the sound from one speaker to the next, although a separate volume control would have to be fitted to each speaker. Each volume control could then have a different ‘address’.
Sound system components Just to summarise what I have discussed so far, I thought it would be useful to show a diagram of how these various sound effect modules might fit together into a system (see Figure 4). In future jottings I will attempt to give more detail and explain how the various modules might be bought (Part Two) or built (Part Three).
Figure 4. Schematic of the modules required in a sound system showing how they might be linked.
Operation
In case the above account makes the operation of sound seem like a labour-intensive activity, it is worth just running through the operating sequence here. For each train that is run, block bells are used to check the line is clear and then the signalmen set up the route. My timetable shows which locomotive is rostered so the signalman with the rotary-selector (see Figure 2) chooses the correct loco prior to acknowledging ‘Train Entering Section’ on the block bells for the train that is going to arrive at his station. This is also the signal for the train to be controlled by the receiving signalman (all electrical connections being made by the correct signals). The signalman moves the wiper on the linear rheostat (see Figure 3) to localise the sound in the tunnel and starts to move the train. As the loco passes through the tunnel mouth it triggers a reed switch, which blows a pre-recorded whistle. The signalman follows the train’s progress on the rheostat, which automatically increases the volume as the loco emerges from the tunnel. As the train coasts and slows for the station the exhaust volume decreases – the chuffing sound has disappeared altogether by the time the train glides into the platform, allowing the bystanders to hear the ‘Train Out Of Section’ bell code being sent to the signalman in the rear, and acknowledged. As the loco pulls up to the Starter signal, it triggers another reed switch, which starts a recording of station sounds – doors slamming and a Guard shouting. The only sound from the loco is that of the blower’s quiet hiss. The fireman continues to prepare for departure and breaks up some coal in the bunker whilst the sounds of seagulls remind him that he is approaching the seaside terminus of this branch line.
After a while, if the fireman has not been paying attention, the safety valves lift and the ‘blow-off’ sound comes from the vicinity of the loco (assuming the signalman has positioned the rheostat wiper correctly). Having checked the line ahead using the block bells, and set the route, the signalman can now give his full attention to producing some authentic sounds, because the signalman in advance is in control of the train. Just prior to departure, two tones of the whistle are sounded (also available on the signalman’s control – see Figure 2) and as the loco wheels start to turn, the slow but strong exhaust beat is heard loud and clear, echoing around the station area. After passing the Advance Starter the loco goes under a road bridge and the sounds are considerably reduced. Finally, as the loco passs through the wall of my shed and emerges into the garden, another reed-switch operates a different pre-recorded whistle and the outside signalman knows the train is on its way.
When this all works correctly, the multi-sense experience is much more exhilarating than just watching the operations visually. It is well worth the effort. The next stage in my project is to capture both the visual and audio experience on video using these new miniature CCD/CMOS cameras and wireless links where the camera can be mounted on the train.
Conclusion
I hope that I have at least given you something to think about in this article. One aim was to stir up a few ideas and some different ways of thinking about this hobby of ours. Another objective was to encourage you to try some fairly simple additions that will start to stimulate the ears of your visitors and maybe help them to have an experience of railways that is even closer to the real thing.
In Part Two of this article I will be discussing some of the commercially-available sound systems including kits of parts and some relatively inexpensive ways of stimulating your visitors’ sense of hearing. If there are any manufacturers who wish me to include details of their ‘sound’ products, or indeed fellow modellers with experiences to share, then please get in touch via e-mail (Robert@RosewarneJunction.me.uk). I will do my best to give a comprehensive coverage of the options available.
Acknowledgements I would like to thank both Michael Walshaw and Stephen Denny for kindly reading this article and making many useful comments and suggestions.
References
1. “Sounds of Westport”, by Michael Walshaw. Modelling Railways Illustrated, Vol 3, No 3, pp 134-138, Nov 1995.
2. “Smoke effects,” by John Dornom, Model Railway Journal, No 92, page 30, 1997.
3. “Laira – some contemplations,” by John Dornom, Gauge ‘O’ Guild Gazette, Vol 13, No 6, pp 207-212, 1997.
4. “Atmospheric Smoke,” by John Dornom, Model Railway Journal, No 97, pp203-214, 1997.
5. “Smoke Effect”, Railway Modeller, July 1997.
6. “Model Sound Effects”, by Michael Walshaw. Your Model Railway, Vol 2, No 11, pp 803-805, Nov 1985.
7. Early article by Richard Gardner. Scale Trains, Vol 1, March 1982.
8. “Train Sounds in Stereo”, by Richard Gardner. Scale Model Trains, Vol ?, No ?, pp 194-195, ??? 199?.
Figures

This photograph shows the sound system’s main control box – a modified version of the original Q-kits box. The fascia was produced on a computer in MS Word using white lettering on a black background, printed normally and just stuck on the box. The 25-pin D-type connector and ribbon cable goes to the signalman’s remote control unit.
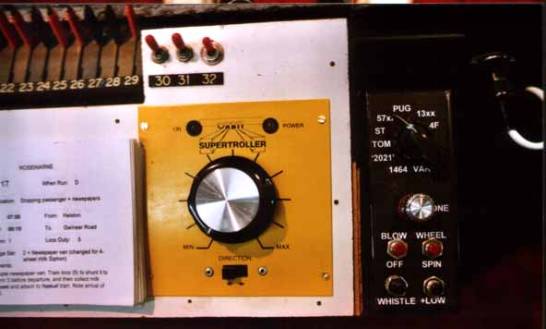
The signalman’s remote control unit is in a separate black box attached to the control panel, connected to the main sound system via a 25-way ribbon cable. The rotary switch at the top selects the locomotive and the central control changes the tone. Other push-buttons duplicate the ‘Blow-off’, ‘Wheel-spin’ and whistle features.
As Above
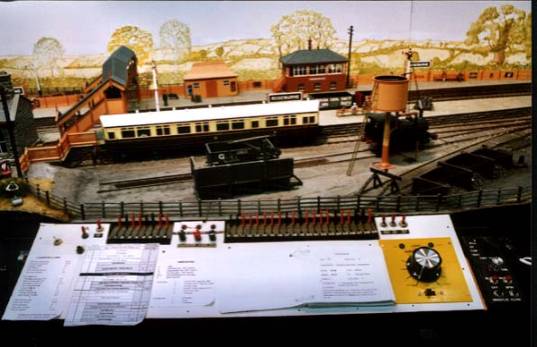
The full signalman’s control panel with lever frame, three push buttons for block bells, instructions for block signalling and the timetable sheets. The pulsed controller and sound system’s remote control unit are on the right.
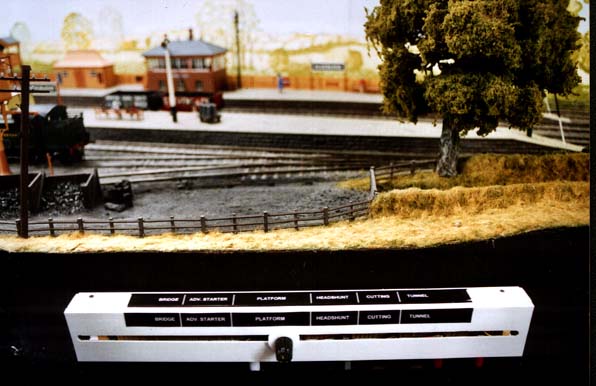
The linear rheostat throws the sound to the speakers connected nearest to the wiper knob. Connections for the speakers are underneath the unit, which is attached to the side of the layout.
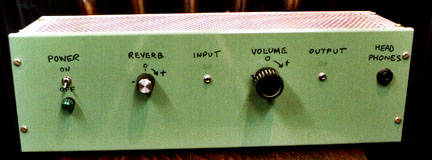
The reverberation unit, containing a spring-line and mixing amplifier is housed in a metal box for good screening from noise.
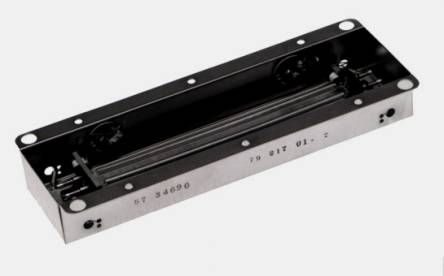
A typical spring-line reverberation tank containing two or three springs.
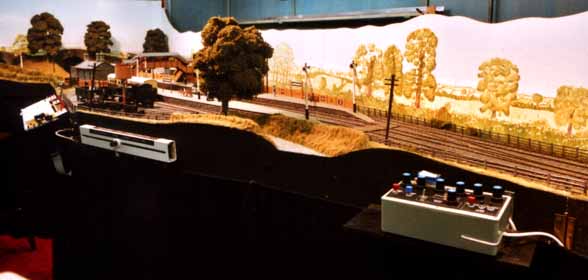
This photograph shows the overall arrangement with the remote control nearest the signalman’s control position.
© Copyright Robert A Smith, 2005-19